3. Installing the Wings and Header
From here on out, every cut counts. It is very hard to recover from mistakes, and even if others do not notice, you know that flaw is there. Take your time, each piece took me about 40 minutes to 1 hour to install.
You will be using the DAP Weldwood contact cement to cement this in. The fumes are very strong, so vent your workspace. I also used a 2 inch brush to apply the glue to both the back of the carpet and the body itself. Each piece requires about 20 minutes to tack. Don’t worry, you will have plenty of time to put down, mold, pull up, put down again (and again and again). Let each piece dry for another 40 minutes, but in the way that I install these, you will not be standing on a freshly glued piece. I used 1 gallon of DAP on this project.
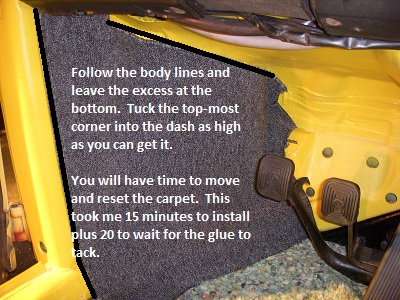
Fit the front driver’s wing first. Fit it before you glue it and make sure you know how it orients into the body line at the top of it’s area. I did not cut out the heater tube access hole, oh well… I made no cuts to either wing. Set it onto your table and cut the fray off.
Now, don’t fear the reaper and apply plenty of glue to both the back of the wing, ensuing that you really get it over the edge and into the creases. It should be wet when done. Now do the same to the body, but don’t go as crazy with the glue as you did with the carpet. Follow the black lines I have outlined as body lines, which you should note are very obvious when fitting the carpet. Let that tack for 20 minutes.

Come back and install the wing, fitting it around the heater channel cable in the front so the cable is very close to the floor. Place, pull, place tuck, pull back, place, tuck. Take your time, it will smooth out fairly nicely. Jam that top corner under the dash as far as it will go without exceeding the body line. It took me 20 minutes to place the piece and get it to lay properly.
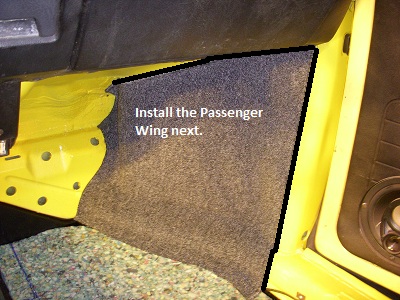
Do the same for the passenger side wing, then move onto the header.

The header requires some cuts and is very hard to get in because of how you need to contort your body to install. Get it around the pedals and get your Sharpie. Line the top up into the body line and even it out end to end. Should have a little space on each end, unfortunately. Mark the areas as best as you can and cut the carpet away from all of the pedal assembly and it’s guts. Ensure that the accelerator cable is accessible. Take out and make your first cuts, then re-install and measure again. You will repeat this process until it fits to your satisfaction.
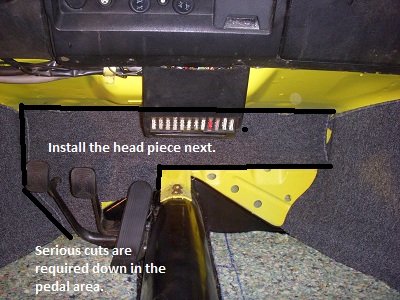
Now glue that piece in, allowing 20 minutes to tack, gluing both the back of the carpet and body area it will go onto. This took me 40 minutes to place and was probably the hardest part of this project.
Leave a Reply
You must be logged in to post a comment.